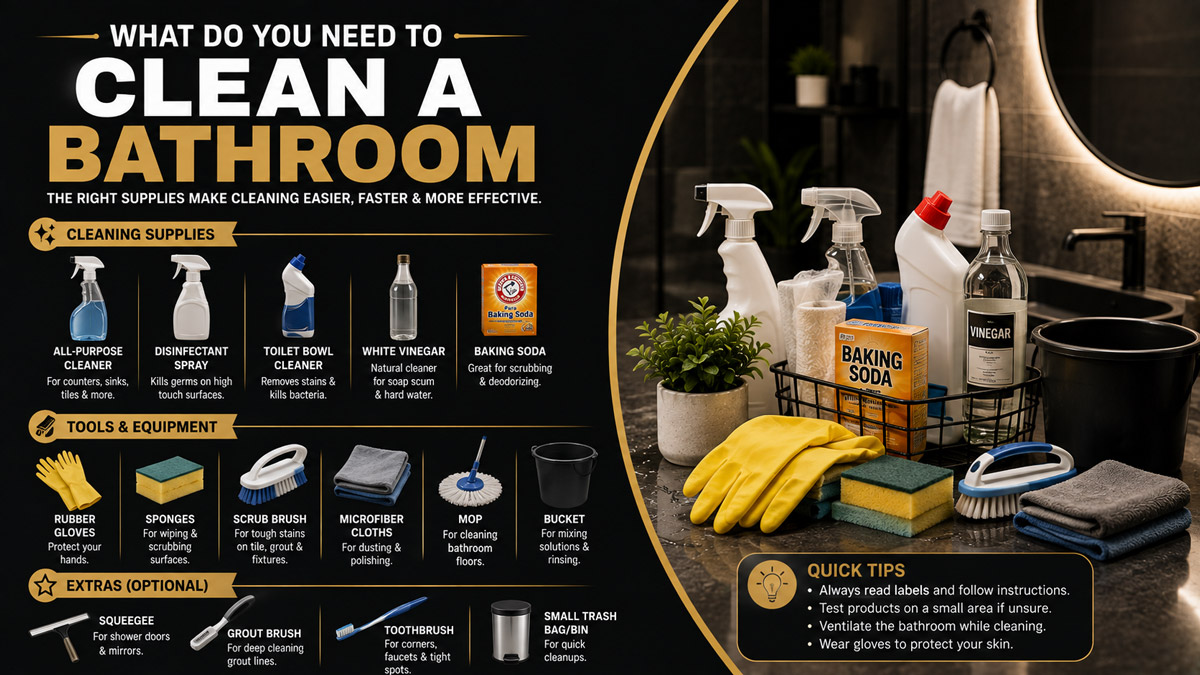
To clean a bathroom, you need an all-purpose bathroom cleaner, an EPA-registered disinfectant when germ control is required, toilet bowl cleaner, glass cleaner, microfiber cloths, a non-scratch sponge, toilet brush, grout brush, vacuum or broom, mop, and protective gloves. Add a descaler for hard water and surface-specific products for stone, acrylic, or specialty finishes.
Key Facts at a Glance
- A basic bathroom-cleaning kit contains about 10-12 products and tools.
- Cleaning removes soil, while disinfecting inactivates pathogens after visible dirt has been removed.
- A disinfected surface must remain wet for the contact time printed on the product label.
- Toilet tools and cloths should never be used on sinks, counters, or shower surfaces.
- Vinegar can dissolve some mineral deposits but is not safe for every surface and is not a universal disinfectant.
- A typical starter kit costs about $30-$60, depending on tool quality and product size.
What Do You Need to Clean a Bathroom Properly?
A properly equipped bathroom-cleaning kit needs four categories: cleaning chemicals, scrubbing and wiping tools, floor-cleaning equipment, and personal protective equipment. Most homes can handle weekly cleaning with 10-12 core items, while bathrooms with hard water, mold, natural stone, or heavy soap scum require specialized products.
The exact product matters less than matching its function to the soil and surface. Soap or detergent removes body oils. Mild acids dissolve many mineral deposits. Mechanical agitation loosens attached residue. Disinfectants work on eligible surfaces only when users follow the labeled concentration, application method, and contact time.
Essential Bathroom Cleaning Checklist
| Item | Primary job | Recommended quantity | Essential or optional |
| All-purpose bathroom cleaner | Removes routine dirt and soap residue | 1 bottle | Essential |
| EPA-registered disinfectant | Inactivates listed pathogens | 1 bottle or canister | Situational |
| Toilet bowl cleaner | Cleans inside the toilet bowl | 1 bottle | Essential |
| Glass cleaner | Cleans mirrors and glass | 1 bottle | Essential |
| Descaler | Dissolves calcium and lime deposits | 1 bottle | Situational |
| Microfiber cloths | Wipes, lifts, and dries residue | 4-6 cloths | Essential |
| Non-scratch sponge | Scrubs sinks, tubs, and showers | 1-2 sponges | Essential |
| Toilet brush | Scrubs bowl and under rim | 1 dedicated brush | Essential |
| Detail or grout brush | Cleans joints and narrow spaces | 1 brush | Essential |
| Vacuum or broom | Removes hair and loose debris | 1 | Essential |
| Mop | Cleans hard bathroom flooring | 1 | Essential |
| Rubber or nitrile gloves | Protects hands from soil and chemicals | 1 pair | Essential |
| Shower squeegee | Removes water from glass and walls | 1 | Optional |
| Bucket | Holds rinse water or diluted cleaner | 1 | Optional |
You do not need a separate chemical for every bathroom surface. A compatible neutral cleaner can often handle counters, sealed tile, cabinet exteriors, and routine tub cleaning. Specialized products become necessary when the bathroom contains mineral scale, rust, mildew staining, natural stone, unsealed grout, or delicate metallic coatings.
Which Cleaning Products Do You Need?
Most bathrooms need a detergent-based cleaner, toilet bowl cleaner, glass cleaner, and a properly registered disinfectant for situations requiring germ control. A descaler or mild abrasive should be added only when the bathroom has mineral deposits, stubborn rings, or attached soap scum.
Cleaning and disinfecting are separate processes. The American Cleaning Institute defines cleaning as removing soil, dirt, and grease, while disinfecting irreversibly inactivates pathogens on surfaces. Visible soil should therefore be removed before a disinfectant is applied.
1. All-Purpose Bathroom Cleaner
An all-purpose bathroom cleaner removes body oils, toothpaste, light soap residue, cosmetic deposits, dust, and ordinary surface soil. Choose a product labeled for the specific materials in your bathroom, especially when cleaning acrylic tubs, painted cabinets, laminate counters, or specialty fixtures.
A spray cleaner is convenient for vertical surfaces and quick maintenance. A concentrated liquid may cost less per use but requires careful dilution. More product is not necessarily more effective. Excess cleaner can leave sticky residue that attracts dirt and requires extra rinsing.
2. Toilet Bowl Cleaner
Toilet bowl cleaner is formulated for mineral rings, organic residue, and buildup inside the bowl. Apply it under the rim so the product travels down the interior surface, allow the labeled working time, then scrub with a dedicated toilet brush.
Do not assume every toilet cleaner is compatible with bleach or another disinfectant. Some bowl cleaners contain acids. Mixing an acidic toilet cleaner with chlorine bleach can release dangerous gas. Use one product at a time, flush thoroughly, and follow the label before introducing another chemical.
3. Disinfectant
A disinfectant is needed when the goal is to inactivate listed bacteria, viruses, or fungi rather than simply remove visible dirt. It is especially useful on toilet handles, flush buttons, faucet handles, light switches, doorknobs, and shared bathroom touchpoints when someone is ill.
Choose a product with an EPA registration number in the United States and confirm that the label lists the target surface and organism. The surface must stay visibly wet for the entire labeled contact time. Contact times vary by formulation and claim, so a universal 5-minute or 10-minute rule is inaccurate.
4. Glass Cleaner
Glass cleaner removes fingerprints, toothpaste mist, cosmetic overspray, and light films from mirrors. An alcohol-based or ammonia-based formula often dries quickly, but compatibility and ventilation still matter.
Spray the product onto a clean microfiber cloth when working near painted frames, wood, stone counters, or sensitive fixtures. This method limits overspray and prevents droplets from landing on incompatible materials.
5. Descaler or Acidic Cleaner
A descaler dissolves mineral deposits such as calcium and lime around faucets, showerheads, glass, and tile. It is useful in hard-water areas where ordinary detergent leaves white crusts or cloudy films.
Acidic products are not universal bathroom cleaners. Avoid using vinegar, citric acid, or commercial acid descalers on marble, limestone, travertine, terrazzo containing calcium-based stone, and other acid-sensitive materials. Repeated acid exposure can etch the surface and dull the finish.
6. Mild Abrasive Cleaner
A mild abrasive helps remove stubborn rings, attached soap scum, and marks from durable surfaces such as certain porcelain fixtures. Baking soda and commercial soft cleansers fall into this category.
Test the product in an inconspicuous area first. Even a mild abrasive can alter gloss when used aggressively or repeatedly. Avoid steel wool, rough scouring pads, and abrasive powder on acrylic, fiberglass, polished metal, coated fixtures, and delicate glass.
Commercial, Plant-Based, or Homemade Cleaners?
Commercial products are usually the most predictable option for heavy soil or verified disinfection, while plant-based products can work well for routine cleaning when their labels match the task. Homemade solutions are inexpensive, but their performance, compatibility, and antimicrobial claims are limited.
| Cleaner type | Best use | Typical cost | Main limitation |
| All-purpose commercial spray | Weekly sink, counter, tile, and tub cleaning | $3-$8 per bottle | May leave residue if overapplied |
| EPA-registered disinfectant | High-touch surfaces and illness response | $4-$10 per bottle | Requires exact contact time |
| Plant-based cleaner | Light routine soil and odor-sensitive homes | $4-$12 per bottle | May struggle with heavy scale |
| White vinegar solution | Compatible hard-water deposits and glass | $2-$5 per gallon | Can etch natural stone |
| Baking soda paste | Localized scrubbing on compatible surfaces | $1-$4 per box | Can dull glossy finishes |
| Dedicated descaler | Calcium, lime, and mineral crust | $5-$15 per bottle | Acid-sensitive surface risk |
| Hydrogen peroxide product | Label-approved stain or disinfection tasks | $3-$10 per bottle | Light and storage conditions matter |
Vinegar is often overestimated. It may help loosen mineral deposits, but it does not replace an EPA-registered disinfectant when verified pathogen control is required. University of Minnesota Extension states that vinegar is not an acceptable sanitizer in its surface-sanitizing guidance because it does not adequately sanitize surfaces.
Which Bathroom Cleaning Tools Are Essential?
The essential tools are microfiber cloths, a non-scratch sponge, a toilet brush, a narrow detail brush, and floor-cleaning equipment. Each tool should have a defined surface zone so contamination from the toilet area does not spread to faucet handles, counters, or mirrors.
A professional-style setup uses color coding. For example, reserve red cloths for toilet exteriors, blue for mirrors, yellow for sinks and counters, and green for showers or tubs. The specific colors do not matter. Consistent separation does.
Microfiber Cloths
Keep at least four microfiber cloths in the bathroom kit. One should be dedicated to the toilet exterior, one to the sink and counter, one to glass, and one to final drying or polishing.
Microfiber performs best when it is clean and not saturated with product. Fold each cloth into quarters to create eight usable wiping faces. Turn to a fresh face when the current section becomes visibly dirty, then replace the cloth instead of spreading residue.
Wash bathroom cloths after use according to their care labels. Avoid fabric softener because it can coat fibers and reduce absorbency. Store clean cloths dry, away from toilet brushes and used sponges.
Non-Scratch Sponge
A non-scratch sponge supplies mechanical agitation for tubs, shower walls, sinks, and compatible counters. Use light pressure and allow the cleaner time to loosen residue before scrubbing.
Replace the sponge when it develops an odor, remains discolored after washing, begins separating, or loses its scrubbing texture. A sponge used around the toilet should never return to sink or shower duty.
Toilet Brush
A toilet brush should have stiff, intact bristles and a shape that reaches beneath the bowl rim. After scrubbing, rinse it in clean flush water when appropriate, allow excess water to drain, and let it dry before closing it inside a holder.
Replace the brush when the bristles become flattened, brittle, permanently stained, or difficult to rinse. A brush that remains wet in a sealed holder can develop odor and microbial buildup.
Grout and Detail Brush
A grout brush has narrow, stiff bristles that reach recessed joints, corners, faucet bases, drain edges, sliding-door tracks, and toilet-seat hinges. An old toothbrush can handle light detail work, although its smaller head makes large grout areas slow.
Use caution with powered drill brushes. They save time on durable tile but can damage loose grout, flexible sealant, acrylic, coatings, and fragile joints. Manual tools give better control near vulnerable materials.
Vacuum, Broom, and Mop
A vacuum or broom removes hair, dust, and lint before wet floor cleaning. Skipping this stage turns loose debris into muddy residue and makes the mop less effective.
Use a washable flat mop or small string mop that fits behind the toilet and around the vanity. Keep the bathroom mop head separate from heavily soiled outdoor or garage areas. Wash and dry reusable pads after each use.
What Protective Equipment Should You Use?
At minimum, wear chemical-resistant household gloves and ventilate the room. Eye protection, closed shoes, and protective clothing become sensible when pouring concentrates, using bleach, scrubbing overhead surfaces, or working where chemicals may splash.
The CDC states, “Never mix household bleach with any other cleaners or disinfectants.” It also recommends fresh-air ventilation when products are used indoors and protective equipment when handling bleach.
Basic Safety Kit
- Reusable rubber or disposable nitrile gloves
- Safety glasses for splash-prone work
- Closed, slip-resistant shoes
- Old clothing or a washable apron
- Open window, exhaust fan, or both
- Product labels kept readable and attached
- Clean water available for rinsing
- Original containers for chemical storage
Gloves reduce direct skin exposure, but they do not make incompatible chemical combinations safe. Wash gloved hands before removing the gloves, remove them without touching the contaminated exterior, and wash bare hands afterward.
Which Product Is Safe for Each Bathroom Surface?
Surface compatibility determines whether cleaning removes soil or creates permanent damage. Read both the cleaner label and the fixture manufacturer’s instructions before using acids, abrasives, bleach, solvent-based products, or powered scrubbing tools.
| Bathroom surface | Safer routine choice | Avoid unless approved | Main risk |
| Glazed porcelain | Neutral cleaner and non-scratch sponge | Metal scouring pads | Surface scratches |
| Acrylic tub | Mild detergent and soft cloth | Abrasive powders, solvents | Dulling and cracking |
| Fiberglass shower | Mild bathroom cleaner | Harsh abrasives | Worn gel coat |
| Ceramic tile | Neutral cleaner | Excessively strong acid | Grout or glaze damage |
| Cement-based grout | pH-neutral cleaner and grout brush | Repeated acid use | Erosion and discoloration |
| Marble or limestone | Stone-safe pH-neutral cleaner | Vinegar, lemon, acid descaler | Etching |
| Chrome fixture | Mild soap and soft microfiber | Rough pads and long acid contact | Scratches and finish damage |
| Matte black fixture | Manufacturer-approved mild cleaner | Abrasives, wax, strong chemicals | Uneven finish |
| Mirror | Glass cleaner on cloth | Saturating edges or backing | Black-edge damage |
| Glass shower door | Compatible glass cleaner or descaler | Metal blades used carelessly | Scratches |
| Luxury vinyl floor | Diluted neutral floor cleaner | Flooding and steam unless approved | Edge or adhesive damage |
| Natural wood vanity | Damp cloth and approved wood cleaner | Standing water and overspray | Swelling and finish failure |
The safest rule is to start with the least aggressive method. Use a mild compatible cleaner, allow adequate working time, agitate with a soft tool, and escalate only if residue remains.
How Many Cloths and Brushes Do You Need?
A single household bathroom needs about four to six microfiber cloths, two scrubbing tools, one toilet brush, and one floor-cleaning pad per cleaning session. Shared or heavily used bathrooms may require more cloths so each surface can be cleaned with uncontaminated material.
A practical allocation is:
- One cloth for mirrors and glass.
- One cloth for sinks and counters.
- One cloth for shower or tub surfaces.
- One dedicated cloth for the toilet exterior.
- One dry cloth for fixtures and final polishing.
- One spare cloth for unexpectedly heavy soil.
Two bathrooms can share bottles and durable tools, but each toilet should ideally have its own stored bowl brush. Cloths and mop pads can be shared only after laundering and complete drying.
What Do You Need for a Deep Bathroom Clean?
A deep clean requires the basic kit plus a descaler, detail brush, grout brush, bucket, additional cloths, and tools for neglected edges and fixtures. Add a plastic scraper for compatible hard surfaces, but never use a bare metal blade without confirming the surface can tolerate it.
Deep-Clean Upgrade List
- Hard-water descaler
- Mold or mildew product approved for the surface
- Extra grout brush
- Small detail brushes
- Plastic scraper
- Bucket for rinsing
- Six to ten microfiber cloths
- Disposable towels for contaminated material
- Vacuum crevice tool
- Mop with a fresh pad
- Safety glasses
- Step stool with non-slip feet
- Drain hair-removal tool
- Laundry bag for used cloths
A deep-cleaning kit does not fix failed caulk, leaking plumbing, cracked grout, damaged coatings, or mold growing inside walls. Cleaning can remove surface soil and some staining, but recurring moisture damage requires repair.
How Do You Use the Supplies in the Right Order?
The most efficient sequence is to clear the room, remove dry debris, apply compatible cleaners, scrub from cleaner areas toward dirtier areas, rinse, disinfect selected touchpoints, clean glass, and finish with the floor. Working from high to low prevents debris from falling onto completed surfaces.
Step 1: Clear and Ventilate the Bathroom
Remove towels, rugs, toiletries, trash, and movable storage. Open a window or turn on the exhaust fan before applying chemicals.
Success checkpoint: counters, tub edges, and floor areas are accessible. A common mistake is spraying around bottles and decorations, leaving hidden rings and residue.
Step 2: Remove Dust and Hair
Dust vents, shelves, light fixtures, window ledges, and baseboards. Vacuum or sweep the floor, including behind the toilet and beneath the vanity edge.
Success checkpoint: no loose hair remains on wettable surfaces. Do not wet the floor first because hair becomes harder to collect.
Step 3: Apply Compatible Cleaners
Apply toilet bowl cleaner inside the bowl. Spray bathroom cleaner on the shower, tub, sink, and counter according to label directions.
Allow the cleaner to work for the stated period without letting it dry unexpectedly. Product dwell time softens soil and reduces aggressive scrubbing.
Step 4: Scrub the Shower, Tub, and Sink
Use a non-scratch sponge on broad surfaces and a detail brush around faucets, drains, tracks, and grout. Rinse from top to bottom.
Success checkpoint: the surface feels smooth rather than greasy or gritty. If residue remains, identify whether it is soap scum, mineral scale, rust, or damaged material before applying a stronger product.
Step 5: Clean the Toilet
Scrub beneath the rim and throughout the bowl, then flush as directed. Clean the tank handle, tank, lid, seat, hinges, exterior bowl, and base using toilet-only cloths.
Work from the least contaminated exterior area toward the base. Never return a toilet cloth to the sink or counter.
Step 6: Disinfect Selected Touchpoints
Pre-clean visibly dirty areas, apply the disinfectant, and keep the surface wet for the full contact time printed on the label. Suitable targets may include flush handles, faucet handles, light switches, doorknobs, and grab bars.
The CDC and American Cleaning Institute both emphasize that the surface must remain wet throughout the labeled contact time. Wiping immediately can prevent the product from achieving its registered disinfection claim.
Step 7: Clean Glass and Fixtures
Apply glass cleaner to a clean microfiber cloth and wipe the mirror in overlapping passes. Dry faucets and compatible metallic fixtures with a separate cloth to reduce spotting.
Success checkpoint: inspect the mirror from two angles under good lighting. Persistent streaks usually indicate excess product, a contaminated cloth, or residue from a previous cleaner.
Step 8: Mop Toward the Door
Mop from the farthest corner toward the exit. Use the floor manufacturer’s recommended dilution and avoid leaving standing water around vanity bases, wall edges, or floor seams.
Allow the floor to dry before replacing rugs and bins. Returning damp items can trap moisture and odors.
How Long Does Bathroom Cleaning Take?
A maintained bathroom usually takes 20-30 minutes to clean, while a detailed deep clean commonly takes 60-120 minutes. Size, ventilation, fixture count, hard-water scale, clutter, and time since the last cleaning affect the total more than the number of products used.
| Bathroom condition | Typical time | Cloths needed | Main extra task |
| Light weekly maintenance | 15-25 minutes | 4 | Wiping and floor care |
| Standard weekly clean | 25-40 minutes | 4-6 | Shower and toilet scrubbing |
| Monthly detailed clean | 45-75 minutes | 6-8 | Grout, edges, and fixtures |
| Heavy soap scum | 60-100 minutes | 6-10 | Repeated application and rinsing |
| Hard-water buildup | 60-120 minutes | 6-10 | Surface-safe descaling |
| Neglected bathroom | 90-180 minutes | 8-12 | Multiple soil types |
| Illness-related disinfection | 30-60 minutes | Disposable or separated | Contact-time compliance |
These are typical practitioner ranges, not fixed standards. A large bathroom with a separate tub, glass enclosure, double vanity, and multiple floor zones may take longer even when regularly maintained.
How Much Does a Bathroom Cleaning Kit Cost?
A basic starter kit typically costs $30-$60. A more complete setup with high-quality reusable tools, specialty cleaners, eye protection, a squeegee, and multiple microfiber cloths may cost $60-$120.
| Kit level | Included items | Typical startup cost | Typical replacement cost |
| Minimum kit | 3 cleaners, 4 cloths, sponge, brush, gloves | $25-$40 | $8-$20 monthly |
| Standard kit | 5 cleaners, 6 cloths, detail brush, mop supplies | $40-$70 | $12-$30 monthly |
| Deep-clean kit | Descaler, grout tools, scraper, extra cloths | $60-$100 | $15-$40 monthly |
| Stone-safe kit | pH-neutral specialty products and soft tools | $50-$90 | $15-$35 monthly |
| Low-fragrance kit | Fragrance-free cleaners and reusable tools | $45-$90 | $15-$35 monthly |
| Multi-bathroom kit | Larger product sizes and duplicate toilet tools | $75-$140 | $20-$50 monthly |
Buying concentrates may lower the cost per cleaning, but only when users measure dilution accurately. Overconcentration increases residue, exposure, and surface risk without guaranteeing better cleaning.
What Should You Add for Special Bathroom Problems?
Special conditions require targeted additions rather than a larger collection of general-purpose sprays. Identify the contaminant and material before choosing the product.
Hard Water
Add a surface-compatible descaler, squeegee, absorbent drying cloth, and small brush for faucet bases. Remove water after showering to slow the return of scale.
Mold or Recurring Mildew
Add a label-approved mold or mildew product, gloves, eye protection, and ventilation. Small surface spots may be cleanable, but recurring growth can indicate leaks, failed ventilation, damaged caulk, or moisture inside building materials.
Natural Stone
Use a pH-neutral stone cleaner, soft cloths, and a non-abrasive brush. Keep vinegar, lemon juice, acidic toilet cleaner, and general descalers away from calcium-based stone.
Chemical Sensitivities or Asthma
Choose low-fragrance or fragrance-free products, improve ventilation, and minimize aerosol sprays. CDC guidance notes that some cleaning and disinfecting products can trigger asthma, so labels and exposure controls matter.
Homes With Children or Pets
Store chemicals in original labeled containers and keep them inaccessible to children and animals. Do not leave filled buckets unattended. Rinse surfaces when the product label requires it and allow floors to dry before reopening the area.
Common Bathroom Cleaning Mistakes
Mixing Cleaning Chemicals
Never mix bleach with ammonia, acids, vinegar, toilet bowl cleaner, or another cleaning product unless the manufacturer explicitly states that the combination is safe. Dangerous vapors can cause severe respiratory injury.
Disinfecting a Dirty Surface
Heavy soil can prevent a disinfectant from contacting the surface effectively. Remove visible dirt with detergent, rinse or wipe as directed, and then apply the disinfectant.
Ignoring Contact Time
A quick spray and wipe may clean a surface without disinfecting it. Keep the surface visibly wet for the entire contact time specified on the label.
Using One Cloth Everywhere
Using the same cloth on the toilet, sink, and mirror transfers soil between zones. Separate cloths by task and place used cloths directly into a washable bag or container.
Scrubbing Before the Product Works
Immediate hard scrubbing wastes effort and increases scratch risk. Apply the correct cleaner, allow its labeled working time, then use the least aggressive tool that removes the deposit.
Treating Damage as Dirt
Etching, worn coatings, stained grout, rust transfer, cracked caulk, and mineral damage may not disappear with cleaning. Stop escalating when the material itself begins to change.
How Often Should Supplies Be Used or Replaced?
Bathroom touchpoints and visible soil should be addressed as needed, while a full routine clean is commonly performed weekly. High-use shared bathrooms may require more frequent toilet, sink, and touchpoint cleaning.
| Item or task | Practical frequency | Replacement trigger |
| Sink and counter wipe | Daily to weekly | Visible soil or shared use |
| Toilet cleaning | Weekly or as needed | Odor, rings, or visible soil |
| Shower squeegee | After each shower | Cracked or uneven blade |
| Microfiber cloth | Fresh cloth each session | Fraying, odor, poor absorbency |
| Sponge | Rinse after each use | Odor, separation, permanent soil |
| Toilet brush | Rinse and dry after use | Flattened or damaged bristles |
| Mop pad | Wash after each use | Persistent odor or worn fibers |
| Grout brush | Rinse and dry after use | Bent or missing bristles |
| Cleaner bottle | Check before each use | Empty, expired, damaged label |
| Gloves | Rinse after use | Cracks, holes, sticky surface |
Replacement should be based on condition rather than an arbitrary date. A tool that remains clean, intact, and fully dry may last longer than a tool stored wet or used on rough surfaces.
Expert Rules for Building a Better Cleaning Kit
Assign every tool a contamination zone. Toilet tools should never cross into sink, mirror, shower, or counter work. Color coding makes this rule easy to follow even when several people clean the home.
Match the cleaner to the soil before increasing strength. Greasy body residue responds to surfactants, while mineral scale may require an acid-compatible descaler. Stronger scrubbing cannot compensate for choosing the wrong chemistry.
Drying is part of cleaning. Removing residual water reduces spots, slows mineral accumulation, and prevents damp tools from developing odor. A dry microfiber cloth and shower squeegee often prevent more work than another bottle of cleaner.
FAQ
Can you clean a bathroom with only soap and water?
Soap or detergent and water can remove routine dirt, body oils, and many germs through washing and wiping. They may be sufficient for ordinary cleaning on compatible surfaces. They do not provide a verified disinfectant claim, remove every mineral deposit, or address all mold and rust stains.
Do you need bleach to clean a bathroom?
No. Most routine bathroom soil can be removed with detergent-based cleaners, non-scratch tools, and water. Bleach is useful only for label-approved disinfection or stain-control tasks. It can damage materials, irritate skin and airways, and create dangerous gas when mixed with acids or ammonia.
Is vinegar enough to clean an entire bathroom?
Vinegar can help dissolve some hard-water deposits on acid-resistant surfaces, but it is not suitable for natural stone and does not replace every detergent, toilet cleaner, or registered disinfectant. Use it only where the fixture manufacturer and cleaning guidance permit acidic products.
What is the minimum bathroom cleaning kit?
The minimum practical kit includes one compatible bathroom cleaner, toilet bowl cleaner, glass cleaner, four microfiber cloths, a non-scratch sponge, toilet brush, detail brush, gloves, vacuum or broom, and mop. Add a registered disinfectant when pathogen control is needed and a descaler when mineral buildup is present.
Should bathroom cleaning cloths be washed separately?
Heavily soiled toilet cloths should be kept separate from kitchen and face towels before laundering. Follow the cloth manufacturer’s washing instructions and use an appropriate detergent cycle. Dry the cloths completely before storage, and avoid fabric softener when it reduces microfiber absorbency.
What should you buy first for a new bathroom?
Start with reusable tools and versatile, surface-compatible products: gloves, six microfiber cloths, a non-scratch sponge, toilet brush, detail brush, mop, neutral bathroom cleaner, toilet bowl cleaner, and glass cleaner. Add specialty chemicals only after identifying hard water, natural stone, mold staining, or another specific need.
The Bottom Line
What do you need to clean a bathroom? Start with a compatible all-purpose cleaner, toilet bowl cleaner, glass cleaner, microfiber cloths, non-scratch sponge, toilet brush, detail brush, gloves, vacuum or broom, and mop. Add disinfectant, descaler, or specialty products only when the surface, contamination level, or household situation requires them.
The safest and most effective kit is not the one with the most chemicals. It is the kit that separates contaminated tools, matches each cleaner to the correct material and soil, follows label directions, provides adequate ventilation, and uses the least aggressive method that completes the job.


