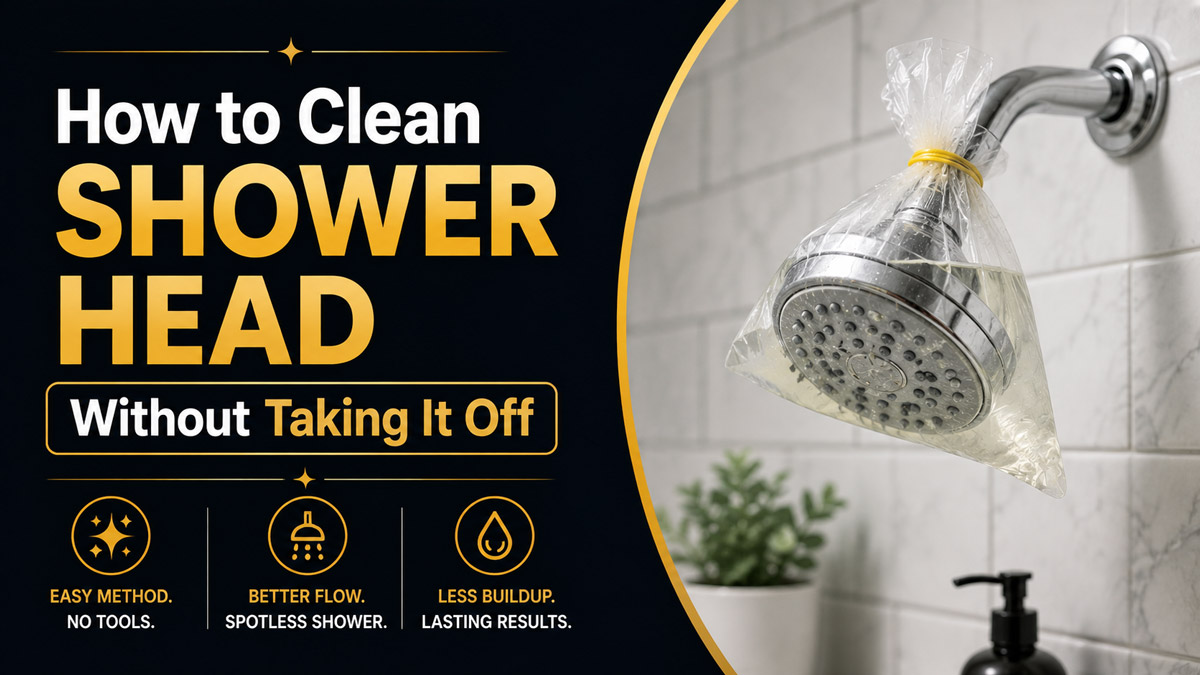
The easiest way to clean a shower head without taking it off is to inspect the finish, protect the shower floor, attach a vinegar-filled bag, soak the nozzles, flush the fixture, brush away loosened scale, and polish it dry. The process takes about 45-75 minutes, requires little skill, and succeeds mainly when the soaking time matches the fixture’s finish.
Before You Start
Time, Difficulty, and Cost
| Detail | Typical requirement |
| Hands-on time | 12-18 minutes |
| Soaking time | 15-60 minutes |
| Total time | 30-80 minutes |
| Difficulty | Beginner |
| Typical cost | $2-$8 |
| Main skill | Securing a liquid-filled bag safely |
| Best for | White scale, crooked spray, mild pressure loss |
| Not ideal for | Internal blockage, damaged cartridges, severe corrosion |
Tools and Materials
| Item | Quantity or specification | Typical cost | Purpose |
| Distilled white vinegar | 1-2 cups, 5% acidity | $1-$3 | Dissolves mineral scale |
| Plastic food-storage bag | 1 gallon-size, freezer grade | $0.20-$0.50 | Holds vinegar around nozzles |
| Rubber band or zip tie | 1 heavy-duty fastener | $0.10-$0.50 | Secures the bag |
| Old toothbrush | Soft or medium bristles | $0-$3 | Loosens softened deposits |
| Microfiber cloth | 1 clean cloth | $1-$3 | Dries and polishes |
| Towel | 1 thick towel | Existing item | Protects the floor |
| Mild dish soap | 2-3 drops, optional | Existing item | Removes body-oil residue |
| Toothpick | 1-2, optional | Existing item | Clears individual silicone jets |
Finish Safety Guide
Check the fixture manufacturer’s instructions when available. Decorative coatings vary, and some warranties prohibit acidic cleaners.
| Shower-head finish | Vinegar contact limit | Preferred approach |
| Chrome | 30-60 minutes | Full bag soak |
| Stainless steel | 30-60 minutes | Full bag soak |
| Uncoated plastic | 30-60 minutes | Full bag soak |
| Brushed nickel | 15-30 minutes | Diluted vinegar, spot-test first |
| Matte black | 10-15 minutes | Diluted vinegar or mild soap |
| Brass | 10-30 minutes | Spot-test, then brief soak |
| Oil-rubbed bronze | 5-10 minutes | Avoid full soak when possible |
| Gold or specialty plating | Manufacturer-specific | Use mild soap first |
Never mix vinegar with chlorine bleach. The combination can release dangerous chlorine gas.
Process Summary
| Step | Action | Time | Most common mistake |
| 1 | Identify the finish | 2 minutes | Assuming every finish tolerates vinegar |
| 2 | Protect the shower area | 2 minutes | Leaving stone surfaces uncovered |
| 3 | Prepare the cleaning liquid | 1 minute | Overfilling the bag |
| 4 | Submerge and secure the head | 3 minutes | Hanging too much weight from the arm |
| 5 | Soak for the correct time | 15-60 minutes | Leaving decorative finishes too long |
| 6 | Remove the bag and flush | 2-3 minutes | Opening the water at full force immediately |
| 7 | Brush the nozzles | 3-5 minutes | Using metal or abrasive tools |
| 8 | Rinse, inspect, and polish | 2 minutes | Leaving acidic residue behind |
Phase 1: Inspect and Prepare
Step 1: Identify the Shower-Head Finish
Confirm the fixture’s material and finish before applying vinegar.
Look at the product manual, manufacturer’s website, packaging, or order history. When that information is unavailable, inspect the surface carefully. Chrome usually looks bright and mirror-like. Brushed nickel has fine directional lines. Matte-black fixtures have a coated, nonreflective surface. Oil-rubbed bronze often has brown or copper-toned highlights.
Test an inconspicuous area before soaking a decorative finish. Apply one drop of diluted vinegar, made from equal parts vinegar and water, to the back of the fixture. Wait 5 minutes, rinse, and dry it. Stop if the surface becomes cloudy, discolored, sticky, or uneven.
You’ll know this step worked when you have selected a safe contact time or decided to use a non-vinegar alternative.
A common mistake is assuming metal color identifies the underlying material. Many fixtures are plated or coated, so treat the outer finish as the deciding factor.
Step 2: Protect the Shower Floor and Nearby Surfaces
Place a thick towel beneath the fixture and cover acid-sensitive surfaces.
Remove bottles, razors, soap, and fabric items from the immediate area. Put a folded towel directly beneath the shower head to catch drips or a falling bag. Cover natural stone, marble, travertine, limestone, or cement-based grout with waterproof plastic before handling vinegar.
Open a bathroom window or run the exhaust fan. Vinegar fumes at household concentration are usually manageable, but ventilation makes the process more comfortable.
Check the shower arm before adding weight. Hold the attached head gently and confirm that the arm does not wobble at the wall. Do not suspend a heavy bag from a loose, cracked, or visibly corroded connection.
You’ll know the area is ready when the floor is protected, fragile surfaces are covered, and the shower arm feels stable.
Most guides skip this preparation, then the bag falls or vinegar reaches an acid-sensitive surface.
Phase 2: Attach the Vinegar Bag
Step 3: Prepare the Cleaning Liquid
Pour enough distilled white vinegar into the bag to cover only the nozzle plate.
Begin with 1 cup of 5% distilled white vinegar. Use up to 2 cups only for a large rainfall-style head. The liquid should cover the spray holes once the bag is raised, but it should not engulf the entire fixture or place unnecessary weight on the shower arm.
For brushed nickel, matte black, bronze, or uncertain finishes, dilute the vinegar with an equal amount of water. Add 2-3 drops of dish soap when the shower head also has greasy soap residue.
Do not combine baking soda with vinegar inside the attached bag. The reaction creates carbon dioxide bubbles and neutralizes much of the acid, reducing its ability to dissolve mineral scale. It can also make the bag expand or overflow.
You’ll know the amount is correct when the bag remains light enough to support with one hand.
The common mistake here is filling the bag first and discovering that it is too heavy after lifting it.
Step 4: Submerge and Secure the Shower Head
Raise the bag around the fixture and secure it without pulling downward on the shower arm.
Hold the bag from the bottom while guiding the shower-head face into the liquid. Submerge the rubber jets and nozzle plate, not necessarily the swivel joint or entire housing.
Gather the bag opening around the narrowest stable section behind the head. Secure it with a thick rubber band, reusable silicone tie, or zip tie. Keep supporting the bag until you confirm the fastener can hold it.
For large heads, reduce the liquid volume and tape the upper sides of the bag to the shower arm for secondary support. Do not bend the arm downward to reach the vinegar.
You’ll know it is secure when the nozzle plate remains submerged for 30 seconds without slipping, leaking, or tilting the arm.
Avoid thin grocery bags. Their seams can split under the weight of the liquid.
Phase 3: Dissolve and Remove the Buildup
Step 5: Soak for the Correct Amount of Time
Leave the nozzles submerged only as long as the finish safely allows.
Soak chrome, stainless steel, or plain plastic for 30-60 minutes. Use the shorter time for light water spots and the longer time for visible white crust.
Limit brushed nickel to 15-30 minutes after a successful spot test. Limit matte-black, brass, bronze, gold-tone, or specialty-coated fixtures to 5-15 minutes unless the manufacturer explicitly permits longer vinegar exposure.
Check the bag every 10-15 minutes. Small white flakes, cloudy liquid, or softer deposits indicate that mineral scale is loosening. Do not leave an attached shower head soaking overnight. Extended exposure can dull plating, weaken some coatings, or affect rubber components.
You’ll know the soak worked when the crust feels softer, the rubber jets flex more freely, or mineral particles appear in the liquid.
Longer is not automatically better. Repeat a short treatment instead of risking finish damage during one excessive soak.
Step 6: Remove the Bag and Flush the Fixture
Support the bag, release the fastener, and flush the shower head gradually.
Hold the bottom of the bag before cutting or loosening the tie. Lower it carefully and pour the used vinegar down the drain while running cool water. Remove the towel only after checking for drips.
Point the shower head away from your face. Turn on cool or lukewarm water at low pressure for 15 seconds, then increase to normal pressure. Run the shower for 2 full minutes. The initial low-pressure flush prevents loosened scale from spraying unpredictably.
Do not use the hottest setting immediately. Hot water can produce strong vinegar fumes and may increase stress on some decorative coatings.
You’ll know the flush worked when loose particles stop appearing and most spray holes produce defined streams.
A common mistake is opening the valve fully at once, which can spray scale and vinegar residue across the enclosure.
Step 7: Brush and Clear the Nozzles
Turn off the water and brush the softened deposits from every spray opening.
Use a damp toothbrush with soft or medium bristles. Brush the faceplate in small circles for 2-3 minutes, concentrating on white rings around the holes.
Massage flexible silicone nozzles between your thumb and finger. Bend each nozzle gently from side to side to break loose internal flakes. Use a wooden toothpick for individual blocked holes, inserting only 2-4 millimeters. Never force a needle, safety pin, drill bit, or metal wire deep into the jet because it may enlarge or puncture the nozzle.
Wipe away debris, then run the shower for another 30 seconds.
You’ll know this step worked when the streams are straighter and fewer holes remain blocked.
Do not use steel wool, abrasive powder, or a stiff wire brush. These tools can permanently scratch the faceplate.
Step 8: Rinse, Inspect, and Polish
Rinse the exterior with clean water, dry it completely, and inspect the spray pattern.
Wipe the entire fixture with a clean cloth dampened with plain water. This removes acidic residue from seams, plated surfaces, and the swivel joint. Dry it with microfiber to prevent new water spots.
Run the shower at normal temperature and pressure for 30-60 seconds. Observe the streams from the side. They should appear more uniform, with less sideways spraying and fewer dead holes.
You’ll know the process succeeded when the visible scale is reduced, the spray pattern is straighter, and water flow is equal to or better than before cleaning.
Persistent low pressure does not always mean the cleaning failed. The blockage may be behind the faceplate, inside the inlet screen, or elsewhere in the plumbing.
Common Mistakes and How to Fix Them
The Bag Slips Off
Cause: Too much liquid, a weak bag, or a loose rubber band.
Fix: Use a freezer-grade bag, reduce the vinegar to the minimum needed, and secure it with a reusable tie or zip tie. Support large bags with waterproof tape.
The Finish Looks Dull
Cause: The fixture soaked too long or reacts poorly to acid.
Fix: Rinse immediately with abundant water and dry it. Stop using vinegar. Follow the manufacturer’s care instructions before applying polish or restoration products.
Water Still Sprays Sideways
Cause: Scale remains inside individual rubber jets.
Fix: Repeat the nozzle-massaging step. Use a toothpick only at the opening, then flush for 1 minute. A second 15-30 minute soak may be needed on vinegar-safe finishes.
Pressure Becomes Lower
Cause: Loosened mineral fragments may have moved into the inlet screen or flow restrictor.
Fix: Run water for another 2-3 minutes. If pressure remains low, the shower head may need to be unscrewed so the internal screen can be rinsed from the inlet side.
Scale Remains After One Treatment
Cause: The deposit is thick, old, or partly composed of soap residue.
Fix: Repeat a safe-duration soak rather than extending the first one. Add 2-3 drops of dish soap during the second treatment if the buildup feels greasy.
Variations for Different Fixtures
Matte-Black or Decorative Finishes
Use equal parts vinegar and water, limit contact to 5-15 minutes, and spot-test first. For manufacturer-restricted finishes, skip the bag method and wipe the nozzles with warm water and mild dish soap.
Rainfall Shower Heads
Use the least liquid necessary because wide heads create more leverage on the arm. Support the bag from above with waterproof tape, or clean half of the nozzle plate at a time.
Cleaning Without Vinegar
Mix 2 cups of warm water with 1 teaspoon of mild dish soap. Attach the bag for 20-30 minutes, brush the jets, and rinse. This method removes soap film but is less effective against hard-water scale.
How Long Does It Take and What Does It Cost?
Most attached shower-head cleanings take 30-80 minutes, including soaking. Hands-on work usually takes 12-18 minutes.
A basic treatment costs about $2-$8 when supplies must be purchased. Reusing a bag, cloth, brush, and fastener reduces the per-cleaning cost to well under $1, excluding water.
Light buildup needs about 15-30 minutes of soaking. Moderate scale usually requires 30-60 minutes. Severe deposits may require two short treatments or removal of the fixture for internal cleaning.
Frequently Asked Questions
How often should a shower head be cleaned?
Clean it every 1-3 months in hard-water areas or whenever streams begin spraying sideways. In soft-water areas, cleaning every 3-6 months is usually sufficient. Drying the faceplate weekly slows visible mineral accumulation.
Can I leave the vinegar bag overnight?
No. Overnight soaking increases the risk of dulling plated metal, discoloring decorative coatings, and affecting rubber components. Use the finish-specific time limit, rinse thoroughly, and repeat a shorter treatment when scale remains.
Should I use baking soda with vinegar?
Do not combine them inside the attached bag. Their reaction produces fizz but neutralizes much of the acid needed to dissolve mineral deposits. Use vinegar alone for scale, or use baking soda separately as a mild paste only when the finish allows gentle abrasion.
Can vinegar damage rubber shower nozzles?
Brief exposure is usually tolerated by common silicone jets, but long or repeated soaking may dry or weaken some elastomers. Keep exposure within the recommended time, rinse thoroughly, and consult the fixture manufacturer for specialty materials.
Why is pressure still low after cleaning?
The restriction may be inside the inlet screen, flow restrictor, hose, valve, or household plumbing. If the exterior jets are clear but pressure remains low, the shower head may need to be removed for internal inspection.
When must the shower head be taken off?
Remove it when flushing does not restore pressure, internal debris rattles inside, the inlet screen is blocked, or leakage occurs at the swivel joint. External soaking cannot reach every internal chamber.
Conclusion
The safest way to clean a shower head without taking it off is to match the vinegar exposure to the finish, use only enough liquid to submerge the nozzles, secure the bag without stressing the arm, and flush thoroughly afterward. A careful 30-60 minute treatment can remove mineral scale, straighten the spray pattern, and restore flow without tools or plumbing work.


